Welcome back to another installment of Fix It Friday. For the most part, these articles are getting progressively more advanced, but today we are actually going to take a step back into a breeze of a project.
Whether your guitar is "broken" or not, you can still FIX it by upgrading the electronics. Often times guitars don't always come stock with the best pots, switches, wiring, etc., so you may want to improve all of your guitar's guts. Today, I'm going to show you how easy this can be with Mojotone's all new completely Solderless Guitar Wiring Harnesses. These Solderless Harnesses come assembled with the pots, switches, connectors, and caps ready to roll -- all we have to do is connect the wires from our pickups.
So first thing's first, let's go over the tools we'll need today.
Wire stripper
Wire cutter
1/2" Drive
Phillips screw drivers #1 and #2
Small flat head screw driver
Yes, it's a short list, and I'm sure you noticed there was no soldering iron on the list. This is going to be fun and easy, and in the end our guitars are going to rock so much harder! So let's get started...
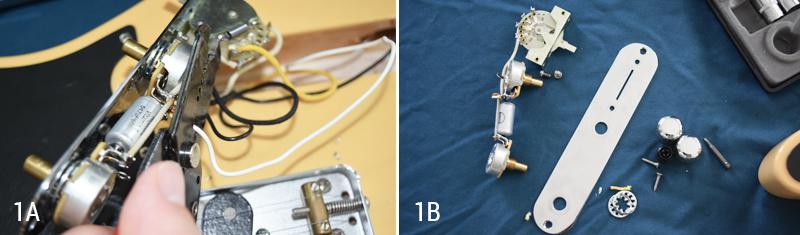
I'm going to be working on a telecaster today. I love this guitar, but I've always wanted to make this kind of modification to it and now is my chance! First, we'll need to remove our control panels with one of our screwdrivers. Once the panel is removed, we need to carefully remove all of our old electronics. The important thing to remember here is that we want to use our existing lead wires, so we need to clip them as close as possible to the potentiometers so that we have a good amount of leftover wire to work with when we go to drop in our new assembly. Once we've clipped our wires, we can unscrew the old knobs, remove the switch tip, and unscrew the switch to dismount all of our old electronics from the plate (see Images 1A and 1B).
Now we need to install our new harness onto the control panel. So let's insert the pots and switch carefully through their respective slots in the control panel. Then apply the washer and nut to the threads on your potentiometers and fasten the nut down with your 1/2-inch drive (See Image 2A). You'll also need to seat the new jack in its place and fasten it down.

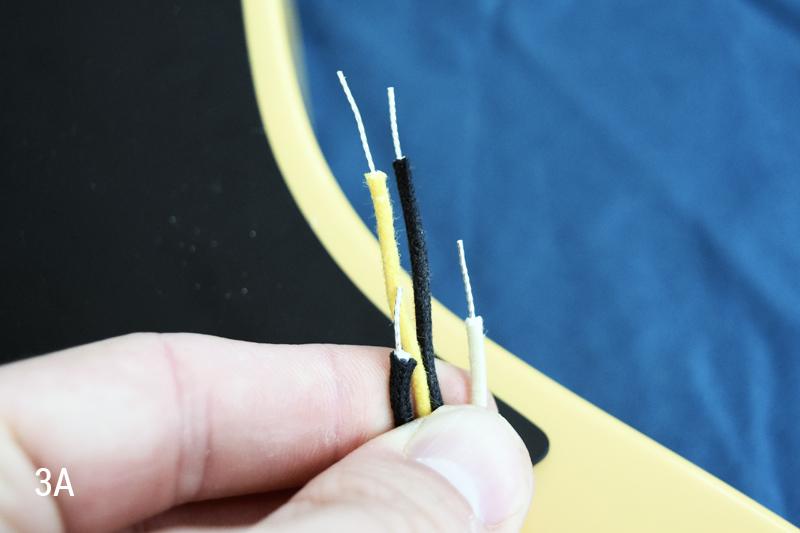
It's time now, to connect all of the leads from our pickups and jack, to their corresponding terminals on the solderless assembly. Let's start by stripping the PVC or cloth insulation off the ends of all of our leads by about 1/4-inch (Image 3A).
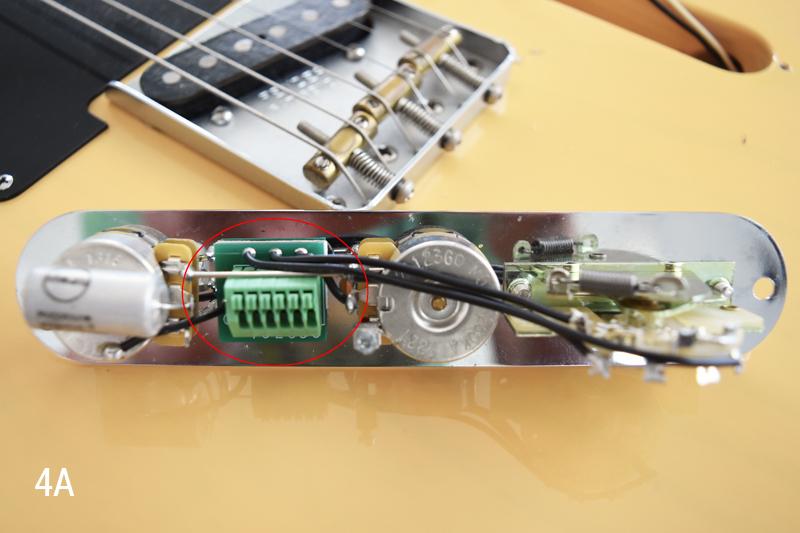
Take a look at your new solderless harness and notice that the switch and pots already have lead wires running out into a small green PC board that is connected to a little green terminal (Image 4A). This is what allows the system to be solderless -- all we need to do now is follow our wiring diagram to see which wires go into which terminals.
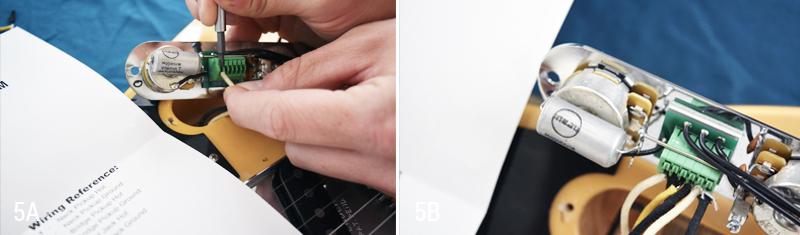
I'm going to follow my diagram now and make the proper connections. Using the small flat head screw driver, push the button on the terminal down, insert the corresponding wire, and then release the button. Your wire should now be fastened securely within its rightful terminal slot. Continue this process until all of your leads are securely fastened within their terminal slots (Images 5A and 5B).
Once all of the wires and secured, you are pretty much finished. Simply reinstall your knobs and switch tip, screw your control plate back into the guitar using the screws that you removed at the start of the project, and voila! See, I told you this was going to be quick and easy. Now you're ready to connect this bad boy to an amp and revel in what glorious spoils you have found in quality electronics. Thanks again for joining us -- we'll see you next time!
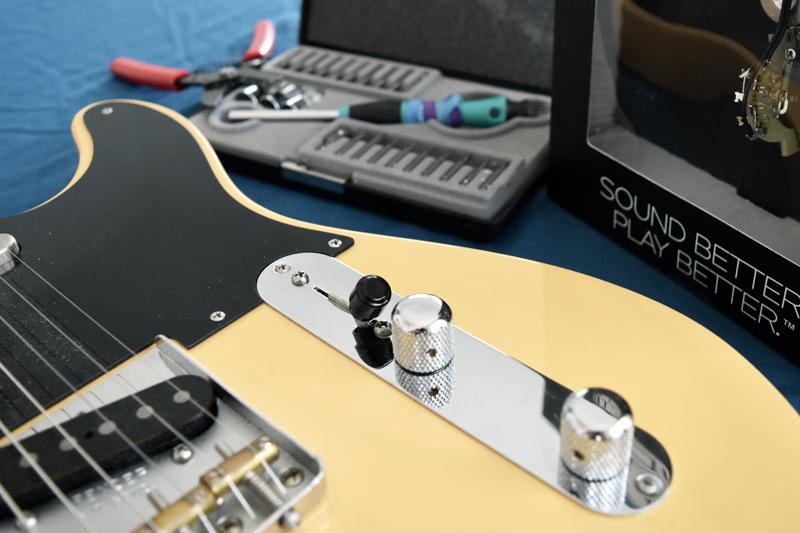
Whether your guitar is "broken" or not, you can still FIX it by upgrading the electronics. Often times guitars don't always come stock with the best pots, switches, wiring, etc., so you may want to improve all of your guitar's guts. Today, I'm going to show you how easy this can be with Mojotone's all new completely Solderless Guitar Wiring Harnesses. These Solderless Harnesses come assembled with the pots, switches, connectors, and caps ready to roll -- all we have to do is connect the wires from our pickups.
So first thing's first, let's go over the tools we'll need today.
Wire stripper
Wire cutter
1/2" Drive
Phillips screw drivers #1 and #2
Small flat head screw driver
Yes, it's a short list, and I'm sure you noticed there was no soldering iron on the list. This is going to be fun and easy, and in the end our guitars are going to rock so much harder! So let's get started...
I'm going to be working on a telecaster today. I love this guitar, but I've always wanted to make this kind of modification to it and now is my chance! First, we'll need to remove our control panels with one of our screwdrivers. Once the panel is removed, we need to carefully remove all of our old electronics. The important thing to remember here is that we want to use our existing lead wires, so we need to clip them as close as possible to the potentiometers so that we have a good amount of leftover wire to work with when we go to drop in our new assembly. Once we've clipped our wires, we can unscrew the old knobs, remove the switch tip, and unscrew the switch to dismount all of our old electronics from the plate (see Images 1A and 1B).
Now we need to install our new harness onto the control panel. So let's insert the pots and switch carefully through their respective slots in the control panel. Then apply the washer and nut to the threads on your potentiometers and fasten the nut down with your 1/2-inch drive (See Image 2A). You'll also need to seat the new jack in its place and fasten it down.
It's time now, to connect all of the leads from our pickups and jack, to their corresponding terminals on the solderless assembly. Let's start by stripping the PVC or cloth insulation off the ends of all of our leads by about 1/4-inch (Image 3A).
Take a look at your new solderless harness and notice that the switch and pots already have lead wires running out into a small green PC board that is connected to a little green terminal (Image 4A). This is what allows the system to be solderless -- all we need to do now is follow our wiring diagram to see which wires go into which terminals.
I'm going to follow my diagram now and make the proper connections. Using the small flat head screw driver, push the button on the terminal down, insert the corresponding wire, and then release the button. Your wire should now be fastened securely within its rightful terminal slot. Continue this process until all of your leads are securely fastened within their terminal slots (Images 5A and 5B).
Once all of the wires and secured, you are pretty much finished. Simply reinstall your knobs and switch tip, screw your control plate back into the guitar using the screws that you removed at the start of the project, and voila! See, I told you this was going to be quick and easy. Now you're ready to connect this bad boy to an amp and revel in what glorious spoils you have found in quality electronics. Thanks again for joining us -- we'll see you next time!