Welcome back everyone, to another episode of Mojotone’s ‘Fix It Friday’ series. I’m really excited about today’s walkthrough because it addresses an issue we hear about rather often: properly drilling a cabinet for a chassis. This is a simple process which requires very little tools, and can be done in a matter of minutes. People are often hesitant about drilling for their chassis, simply because it’s important to get it right on the first try. If this isn’t done properly on the first go you risk putting unnecessary holes in your cabinet, and since this procedure is typically performed on brand new cabinets, any flubs can be particularly heartbreaking. Today, we are going to go over the drilling procedures for both Blackface style chassis and Tweed style chassis. We have a lot of images and steps to get through, so I’m going to keep my usual fluff to a minimum (you’re welcome).
Tools you’ll need:
PencilTape MeasureAwl or other pointed toolElectric DrillBrad Point Drill BitStandard Drill BitStraight Edge
BLACKFACE STYLE
Blackface style chassis are mounted to the top panel of their cabinet, with the chassis’ control panel facing forward (in the same direction as the baffle), and typically have four mounting holes.
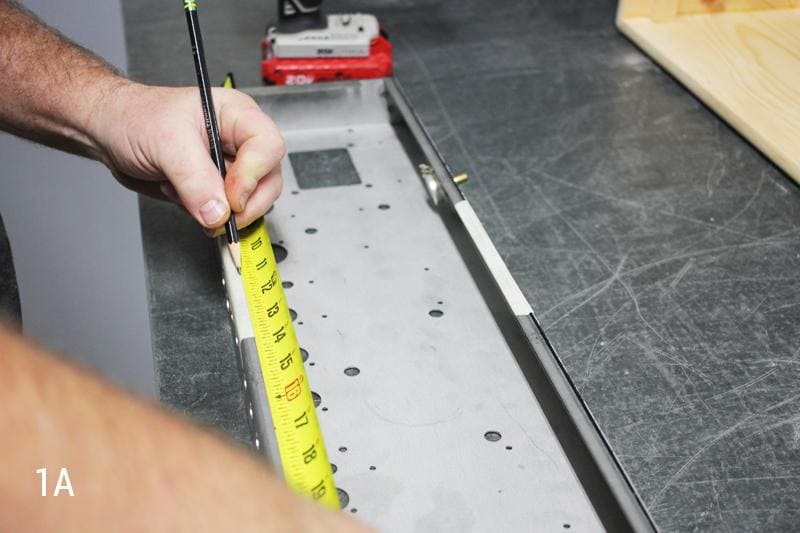
Step 1: Find the center points
To get started, we must first measure to find the center of both the chassis and the cabinet. Once we’ve found those center points, let’s mark them with a pencil on the front AND back edges of each.
Pro Tip: Cover the top edges of the chassis with masking tape before marking. Likewise, if your cabinet has already been covered with tolex, using masking tape on the cabinet before marking.

Step 2: Align the center points
Flip the marked chassis upside down and place it on top of the marked cabinet, with the control panel facing forward (in the same direction as the baffle). Now, align the marked center points with one another.

Step 3: Position the chassis front to back
Use a straight edge tool to ensure the front edge of the chassis and the front edge of the baffle align. Do this on both sides of the chassis/cabinet. Once aligned, this will ensure that your chassis is seated in the proper location from front to back on the cabinet. In the long run this will prevent your amp’s control knobs from getting damaged and help reduce unwanted scratching of the faceplate.

Step 4 : Mark the mounting hole locations
Now that your chassis and cabinet are aligned, you can mark the location of the four mounting holes using an awl or other pointed tool. To do this, leave the chassis in its place on top of the cabinet, insert the tool down through the mounting hole(s) in the chassis and make your marks on the top panel of the cabinet.


Step 5 : Start the mounting holes
Using a brad point drill bit, begin drilling each of your marked mounting locations. Make sure only to drill down roughly a quarter of the depth of the cabinet’s top panel. This is just to get the holes started and create a guide for the standard bit so that the mounting holes are straight and even.


Step 6 : Finish the mounting holes
Using a standard drill bit (of the corresponding diameter to your chassis’ mounting holes), finish drilling the mounting holes through the full depth of the cabinet.
Pro Tip : Let the drill do the work here and do not force the bit down and through the cabinet. This will make for a cleaner exit hole.


You should now have precise mounting holes drilled into the top panel of your cabinet. At this point, you may still need to cover your cabinet or complete any other finishing tasks before actually mounting the chassis on the inside of the cabinet. Otherwise, this cab is ready for a chassis to be mounted!
TWEED STYLE
Tweed style chassis are mounted to the top panel of their cabinet, with the chassis’ control panel facing upward (the amp’s controls will be right-side-up when viewed from the back) , and typically have two mounting holes.
Step 1 : Mark cabinet center point
Measure the full width of the cabinet across the top panel. Determine the center point and mark it on the cabinet with your pencil. You can choose to use a straight edge tool to extend the length of your mark from front to back.
Pro Tip: If your cabinet has already been covered with tolex, using masking tape on the cabinet before marking.


Step 2 : Determine spacing of chassis mounting holes
Using your tape measure, determine the distance (center point to center point) between your chassis’ mounting holes. Some may prefer to measure the full width of the chassis and make a note of the distance of each mounting hole as measured from the left side of the chassis.

Step 3 : Mark the chassis hole locations (left to right)
Transfer the measurements from Step 2 onto your cabinet using the cabinet’s center point marking, as the center point between your mounting hole locations. E.g., If your chassis width was 22”, you would center your measuring device at 11” on the cabinet’s center point; you can then mark the locations of both mounting hole centers.
Pro Tip : Use a straight edge tool to extend the length of your markings so a crosshair can later be made.


Step 4 : Mark chassis hole locations (front to back)
Measure the height of your chassis from top to bottom to determine how far the mounting holes should be from the back edge of the cabinet. Remember, your back panel still needs to fit into the equation. In a Tweed style cabinet, the back panel should sit flush with the back edge of the cabinet. The chassis will then sit butted up to the back panel, thus we need to take the thickness of the back panel into account.
Once you’ve accounted for the back panel, make a small mark on the inner lip of the chassis cutout in the top panel.


Step 5 : Extend markings to make crosshairs
Carefully extend the length of your markings to meet one another in a crosshair. This will give you the final location for the center point of each mounting hole.

Step 6 : Start the mounting holes
Using a brad point drill bit, begin drilling each of your marked mounting locations. Make sure only to drill down roughly a quarter of the depth of the cabinet’s top panel. This is just to get the holes started and create a guide for the standard bit so that the mounting holes are straight and even.


Step 7 : Finish the mounting holes
Using a standard drill bit (of the corresponding diameter to your chassis’ mounting holes), finish drilling the mounting holes through the full depth of the cabinet.
Pro Tip : Let the drill do the work here and do not force the bit down and through the cabinet. This will make for a cleaner exit hole

You should now have precise mounting holes drilled into the top panel of your cabinet. At this point, you may still need to cover your cabinet or complete any other finishing tasks before actually mounting the chassis on the inside of the cabinet. Otherwise, this cab is ready for a chassis to be mounted!
Thanks for tuning in to this week's 'Fix It Friday.' This was a fun article for me, and I certainly hope it proves valuable to you in the near future. We'll see you next time!
Tools you’ll need:
PencilTape MeasureAwl or other pointed toolElectric DrillBrad Point Drill BitStandard Drill BitStraight Edge
BLACKFACE STYLE
Blackface style chassis are mounted to the top panel of their cabinet, with the chassis’ control panel facing forward (in the same direction as the baffle), and typically have four mounting holes.
Step 1: Find the center points
To get started, we must first measure to find the center of both the chassis and the cabinet. Once we’ve found those center points, let’s mark them with a pencil on the front AND back edges of each.
Pro Tip: Cover the top edges of the chassis with masking tape before marking. Likewise, if your cabinet has already been covered with tolex, using masking tape on the cabinet before marking.
Step 2: Align the center points
Flip the marked chassis upside down and place it on top of the marked cabinet, with the control panel facing forward (in the same direction as the baffle). Now, align the marked center points with one another.
Step 3: Position the chassis front to back
Use a straight edge tool to ensure the front edge of the chassis and the front edge of the baffle align. Do this on both sides of the chassis/cabinet. Once aligned, this will ensure that your chassis is seated in the proper location from front to back on the cabinet. In the long run this will prevent your amp’s control knobs from getting damaged and help reduce unwanted scratching of the faceplate.
Step 4 : Mark the mounting hole locations
Now that your chassis and cabinet are aligned, you can mark the location of the four mounting holes using an awl or other pointed tool. To do this, leave the chassis in its place on top of the cabinet, insert the tool down through the mounting hole(s) in the chassis and make your marks on the top panel of the cabinet.
Step 5 : Start the mounting holes
Using a brad point drill bit, begin drilling each of your marked mounting locations. Make sure only to drill down roughly a quarter of the depth of the cabinet’s top panel. This is just to get the holes started and create a guide for the standard bit so that the mounting holes are straight and even.
Step 6 : Finish the mounting holes
Using a standard drill bit (of the corresponding diameter to your chassis’ mounting holes), finish drilling the mounting holes through the full depth of the cabinet.
Pro Tip : Let the drill do the work here and do not force the bit down and through the cabinet. This will make for a cleaner exit hole.
You should now have precise mounting holes drilled into the top panel of your cabinet. At this point, you may still need to cover your cabinet or complete any other finishing tasks before actually mounting the chassis on the inside of the cabinet. Otherwise, this cab is ready for a chassis to be mounted!
TWEED STYLE
Tweed style chassis are mounted to the top panel of their cabinet, with the chassis’ control panel facing upward (the amp’s controls will be right-side-up when viewed from the back) , and typically have two mounting holes.
Step 1 : Mark cabinet center point
Measure the full width of the cabinet across the top panel. Determine the center point and mark it on the cabinet with your pencil. You can choose to use a straight edge tool to extend the length of your mark from front to back.
Pro Tip: If your cabinet has already been covered with tolex, using masking tape on the cabinet before marking.
Step 2 : Determine spacing of chassis mounting holes
Using your tape measure, determine the distance (center point to center point) between your chassis’ mounting holes. Some may prefer to measure the full width of the chassis and make a note of the distance of each mounting hole as measured from the left side of the chassis.
Step 3 : Mark the chassis hole locations (left to right)
Transfer the measurements from Step 2 onto your cabinet using the cabinet’s center point marking, as the center point between your mounting hole locations. E.g., If your chassis width was 22”, you would center your measuring device at 11” on the cabinet’s center point; you can then mark the locations of both mounting hole centers.
Pro Tip : Use a straight edge tool to extend the length of your markings so a crosshair can later be made.
Step 4 : Mark chassis hole locations (front to back)
Measure the height of your chassis from top to bottom to determine how far the mounting holes should be from the back edge of the cabinet. Remember, your back panel still needs to fit into the equation. In a Tweed style cabinet, the back panel should sit flush with the back edge of the cabinet. The chassis will then sit butted up to the back panel, thus we need to take the thickness of the back panel into account.
Once you’ve accounted for the back panel, make a small mark on the inner lip of the chassis cutout in the top panel.
Step 5 : Extend markings to make crosshairs
Carefully extend the length of your markings to meet one another in a crosshair. This will give you the final location for the center point of each mounting hole.
Step 6 : Start the mounting holes
Using a brad point drill bit, begin drilling each of your marked mounting locations. Make sure only to drill down roughly a quarter of the depth of the cabinet’s top panel. This is just to get the holes started and create a guide for the standard bit so that the mounting holes are straight and even.
Step 7 : Finish the mounting holes
Using a standard drill bit (of the corresponding diameter to your chassis’ mounting holes), finish drilling the mounting holes through the full depth of the cabinet.
Pro Tip : Let the drill do the work here and do not force the bit down and through the cabinet. This will make for a cleaner exit hole
You should now have precise mounting holes drilled into the top panel of your cabinet. At this point, you may still need to cover your cabinet or complete any other finishing tasks before actually mounting the chassis on the inside of the cabinet. Otherwise, this cab is ready for a chassis to be mounted!
Thanks for tuning in to this week's 'Fix It Friday.' This was a fun article for me, and I certainly hope it proves valuable to you in the near future. We'll see you next time!