Hello DIYers and welcome back to another installment of Mojotone’s ‘Make It Monday.’ Today is a very exciting day because we are going to finish up that Tweed Champ Style Kit build we’ve been working on for a little while now; i.e., at the end of today’s article, we will have a new guitar amp!
First, we are going to test our circuits to make sure everything is working properly from an electrical standpoint, and barring any serious complications, we should then be able to move on to installing the chassis into our cabinet and rocking out accordingly. Let’s start by connecting our chassis’ to power, getting our wiring diagram and build manual out in front of us, and turning on our multimeter…
We will start by checking a few AC voltages. To do this, our amps should be plugged into power and turned on but should NOT have any tubes installed. When checking these AC voltages, we will be applying the probes on our multimeters to the named pins on the named tubes, and checking for the specified voltages for each. Following our build manuals, we will first check the filament voltage on the preamp tube socket. Apply one probe to either pin 4 or 5, and the other probe to pin 9 on your preamp tube socket. We are looking for a rough reading of 6.3v (Image 1A below).
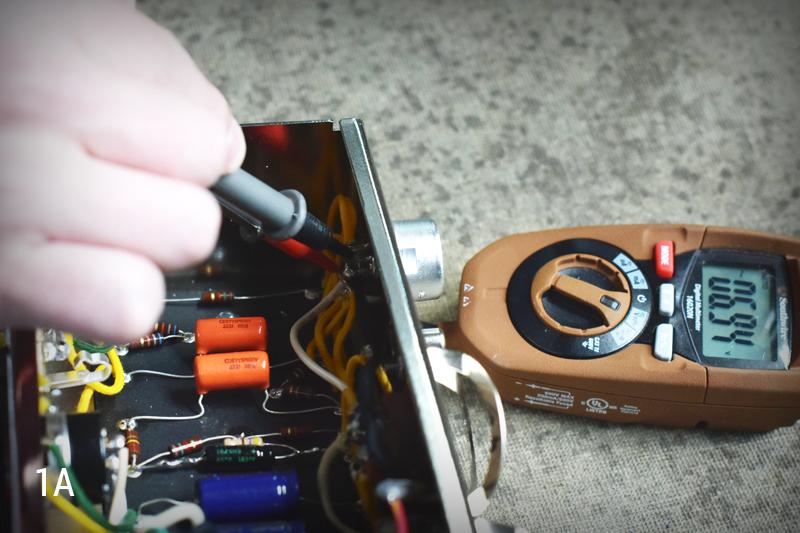
Note : When testing a circuit this way, it is always best practice to remove any metal rings from your fingers. Likewise, be careful that your fingers do not touch any part of the circuit itself -- allow the multimeter probes to do that!
My meter is reading 6.94v, which is within the desirable 10% tolerance range, so I can move on to testing the filament voltage at my power tube and rectifier tube. Now that you have a feel for this maneuver, repeat this process to get your readings on the 6V6 tube socket and the 5Y3 tube socket. Check your build manual for which pins to test and what voltage to be looking for...
All of my voltages were within the proper 10% tolerance range, so let’s get ready to move forward. Power down your amp and install the rectifier tube (5Y3) into its socket. Once the tube is installed, turn the amp back on and allow it to warm up for a full minute so we get an accurate reading. While the amp is warming up, keep an eye out for arcing -- if you see or smell anything suspicious, turn the amp off immediately.
Once the amp is warm, we want to turn our multimeters to DC voltage and test for B+ voltage on the tube socket pins specified in your manual (Image 2A).
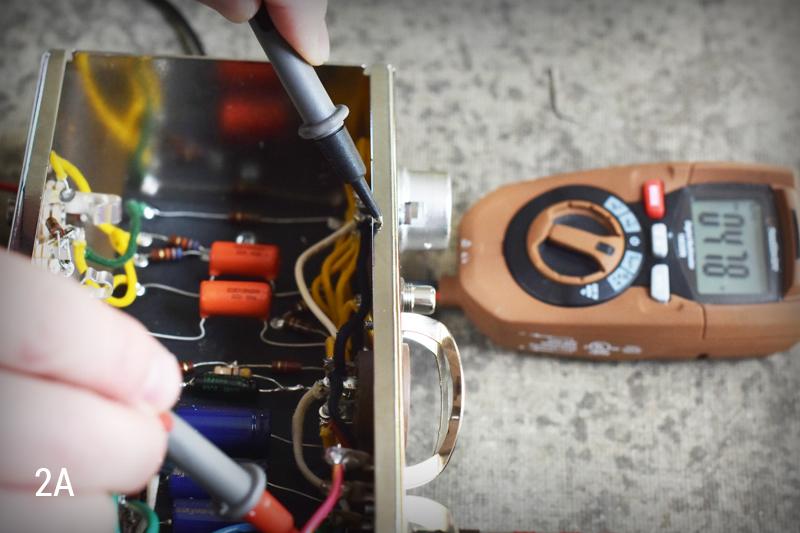
Remember, when we are testing DC volts, we are doing so in regards to ground; this means that our black multimeter probe will need to be touching a ground point (I always use the side of my chassis), and our red probe will need to be touching the point notated in our manual -- see above image.
For the sake of time I won’t be individually outlining the next step of testing, so follow along with your manual on this one, but make sure you stop before you plug in your 6V6 tube and connect the speaker...
I’m doing my testing and installation a little bit out of order. So before we plug in the speaker, we need to create the speaker wire! There are instructions for doing this in your build manual, but now is also the perfect time for us to pitch a previous article on cable wiring. Take a gander at that article for a full walkthrough on RCA cable wiring.
That sure was easy! Now we can connect our speaker to our chassis, insert the 6V6 power tube and finish testing. Use the voltages notated on your wiring diagram (Image 3A) to test at the given points (again this is DC voltage so do your testing with respect to ground).
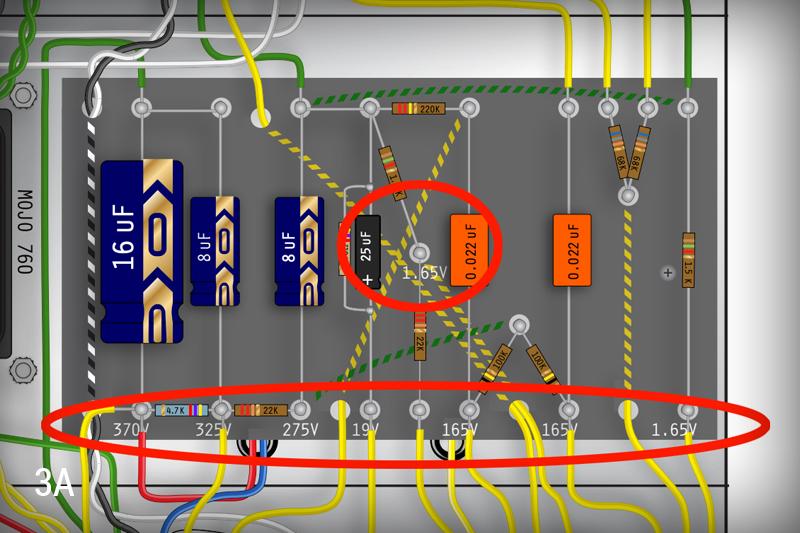
Note : Here again, these test points should can have a respective 10% tolerance which means they do not have to be EXACTLY the value notated on your wiring diagram, but they should be fairly close.
So we’ve followed the testing portion of our build manuals and thus tested the filament voltages on our tube sockets, made sure our power tube is not red plating, and verified all the correct voltages for the points on our board. Guess what...it’s time to install this puppy and get to rocking!
Let’s use a drill or screwdriver to remove our top and bottom back panels, then we will hold the chassis up to the mounting holes to verify the holes are drilled properly and will line up in the end. To do this, make sure the transformers are facing away from you and hold the control panel of the chassis to the top panel of the inside of the cabinet and verify the holes are correct…
Now that we know our holes are correct, we can install the speaker. To do so, remove the locking nuts from the speaker mounting posts, then simply (and gently) put the speaker into place by aligning the mounting holes in the speaker over the mounting posts in the baffle and slowly working the speaker down until it is flush with the baffle…
Once your speaker is in, just tighten those locking nuts back down over the mounting posts to secure the speaker -- then it’s time to install the chassis, which means we are getting REALLY close! Start by inserting the mounting screws down into the mounting holes in the cabinet, then flip the cabinet upside down (this will make it easier to work with). There are a few more steps here, but for the sake of time let’s refer to our build manuals for the specifics, as the verbal explanation of this procedure can get lengthy! Read the steps carefully, familiarize yourself with the procedure and then really take your time doing this part...
Alright, now we just need to put our back panels back on and we are ready to crank this thing up! Please feel encouraged to send in pictures and sound clips of your final build to logan@mojotone.com! Please also feel welcome to send me any troubleshooting questions or general questions/comments.
Guys, this build has been a blast. It was a struggle at times (at least for me), but we got through it together and that’s what counts! I’m going to be busy riffing on this Champ for a while, but thank you all for joining us and we’ll see you next time!
First, we are going to test our circuits to make sure everything is working properly from an electrical standpoint, and barring any serious complications, we should then be able to move on to installing the chassis into our cabinet and rocking out accordingly. Let’s start by connecting our chassis’ to power, getting our wiring diagram and build manual out in front of us, and turning on our multimeter…
We will start by checking a few AC voltages. To do this, our amps should be plugged into power and turned on but should NOT have any tubes installed. When checking these AC voltages, we will be applying the probes on our multimeters to the named pins on the named tubes, and checking for the specified voltages for each. Following our build manuals, we will first check the filament voltage on the preamp tube socket. Apply one probe to either pin 4 or 5, and the other probe to pin 9 on your preamp tube socket. We are looking for a rough reading of 6.3v (Image 1A below).
Note : When testing a circuit this way, it is always best practice to remove any metal rings from your fingers. Likewise, be careful that your fingers do not touch any part of the circuit itself -- allow the multimeter probes to do that!
My meter is reading 6.94v, which is within the desirable 10% tolerance range, so I can move on to testing the filament voltage at my power tube and rectifier tube. Now that you have a feel for this maneuver, repeat this process to get your readings on the 6V6 tube socket and the 5Y3 tube socket. Check your build manual for which pins to test and what voltage to be looking for...
All of my voltages were within the proper 10% tolerance range, so let’s get ready to move forward. Power down your amp and install the rectifier tube (5Y3) into its socket. Once the tube is installed, turn the amp back on and allow it to warm up for a full minute so we get an accurate reading. While the amp is warming up, keep an eye out for arcing -- if you see or smell anything suspicious, turn the amp off immediately.
Once the amp is warm, we want to turn our multimeters to DC voltage and test for B+ voltage on the tube socket pins specified in your manual (Image 2A).
Remember, when we are testing DC volts, we are doing so in regards to ground; this means that our black multimeter probe will need to be touching a ground point (I always use the side of my chassis), and our red probe will need to be touching the point notated in our manual -- see above image.
For the sake of time I won’t be individually outlining the next step of testing, so follow along with your manual on this one, but make sure you stop before you plug in your 6V6 tube and connect the speaker...
I’m doing my testing and installation a little bit out of order. So before we plug in the speaker, we need to create the speaker wire! There are instructions for doing this in your build manual, but now is also the perfect time for us to pitch a previous article on cable wiring. Take a gander at that article for a full walkthrough on RCA cable wiring.
That sure was easy! Now we can connect our speaker to our chassis, insert the 6V6 power tube and finish testing. Use the voltages notated on your wiring diagram (Image 3A) to test at the given points (again this is DC voltage so do your testing with respect to ground).
Note : Here again, these test points should can have a respective 10% tolerance which means they do not have to be EXACTLY the value notated on your wiring diagram, but they should be fairly close.
So we’ve followed the testing portion of our build manuals and thus tested the filament voltages on our tube sockets, made sure our power tube is not red plating, and verified all the correct voltages for the points on our board. Guess what...it’s time to install this puppy and get to rocking!
Let’s use a drill or screwdriver to remove our top and bottom back panels, then we will hold the chassis up to the mounting holes to verify the holes are drilled properly and will line up in the end. To do this, make sure the transformers are facing away from you and hold the control panel of the chassis to the top panel of the inside of the cabinet and verify the holes are correct…
Now that we know our holes are correct, we can install the speaker. To do so, remove the locking nuts from the speaker mounting posts, then simply (and gently) put the speaker into place by aligning the mounting holes in the speaker over the mounting posts in the baffle and slowly working the speaker down until it is flush with the baffle…
Once your speaker is in, just tighten those locking nuts back down over the mounting posts to secure the speaker -- then it’s time to install the chassis, which means we are getting REALLY close! Start by inserting the mounting screws down into the mounting holes in the cabinet, then flip the cabinet upside down (this will make it easier to work with). There are a few more steps here, but for the sake of time let’s refer to our build manuals for the specifics, as the verbal explanation of this procedure can get lengthy! Read the steps carefully, familiarize yourself with the procedure and then really take your time doing this part...
Alright, now we just need to put our back panels back on and we are ready to crank this thing up! Please feel encouraged to send in pictures and sound clips of your final build to logan@mojotone.com! Please also feel welcome to send me any troubleshooting questions or general questions/comments.
Guys, this build has been a blast. It was a struggle at times (at least for me), but we got through it together and that’s what counts! I’m going to be busy riffing on this Champ for a while, but thank you all for joining us and we’ll see you next time!