The Art and Chaos of Relic'ing Tweed
Published on
January 21, 2021 at 2:50:07 PM PST January 21, 2021 at 2:50:07 PM PSTst, January 21, 2021 at 2:50:07 PM PST
Hello again, and welcome back to another episode of Mojotone’s ‘Fix It Friday’ series! Today we aren’t going to be fixing things, but rather doing the exact opposite...we are going to be intentionally and systematically damaging a tweed-covered cabinet.
No one can deny how cool a tweed-covered cabinet looks once it gets a fair amount of age and road wear on it. Tears in the fabric, chaotic stains, and general tinting of the tweed itself all give the material a bump in personality and add soul and story to the gear. Because of this, the concept of intentionally aging tweed material has been explored for many years. With a quick Google search, one could stumble across any number of DIY methods for aging tweed, so today we are going to experiment (and do some side-by-side comparisons) with a few of those methods and see how they all affect the material.
If you are bold enough to follow along, you’ll need a small list of materials:
Tweed-covered cabinetBleachLemonVinegarOven CleanerSpray BottleRasp/Sandpaper/FileCoffeeTea
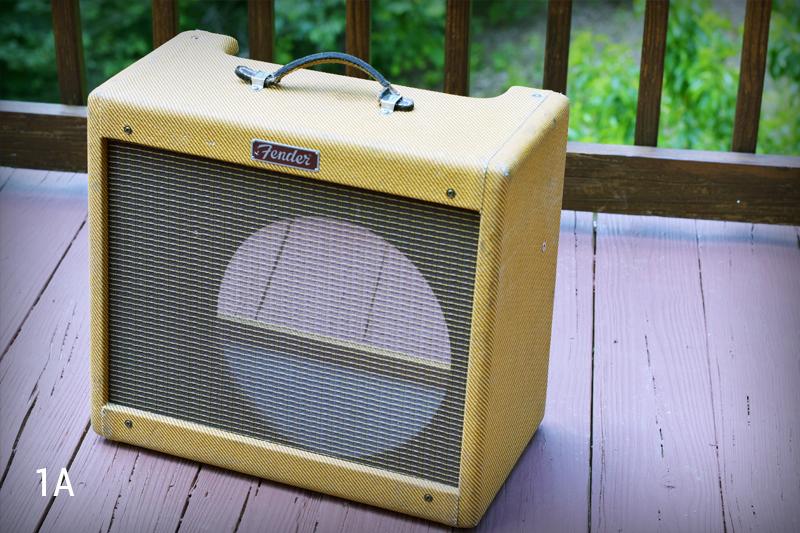
Before I dive in, I am going to remove any and all electronic components from my cabinet to avoid damaging them in any way. As you can see below, in Image 1A, my cabinet is empty and ready to be carefully destroyed.
My cabinet has already been slightly road-worn, which will help with the end result, but I’m ready to get this thing looking like it’s about to tell you the story it heard from its father, and its father before it.
Our goal here today is to cause aesthetic damage to our cabinet without compromising the structural integrity of the cabinet itself -- the enclosure still needs to protect our amp, tubes, and speaker, so any functional damage to the cabinet is not recommended.
SUN AND GENERAL AGE: LEMON JUICE, BLEACH, VINEGAR, OVEN CLEANER
Let’s start by trying to add a few stains to this here cabinet. I plan on experimenting with a few different solutions. I’m going to apply lemon juice, bleach, white vinegar, and oven cleaner to different parts of my cabinet’s back panel to see how the material reacts to each. All of these materials are considered corrosive to varying degrees, and in my research I found that these were all common methods of aging tweed (except the oven cleaner...that one was my idea).
I’m going to slice the lemon, squeeze it and rub it on a specific spot. Then I’ll add my bleach to an old spray bottle using 1 part bleach to 1 part water, use a paper towel to apply the white vinegar, and then simply spray the oven cleaner from its bottle. Once I find a look I prefer (and maybe I’ll prefer a number of looks), I will then apply that solution chaotically across my cabinet.
Notice below in Image 2A, the four places I have applied the different solutions. And then notice in Image 2B the result after 24 hours of letting the back panel sit in the sun while these solutions did their dirty work…
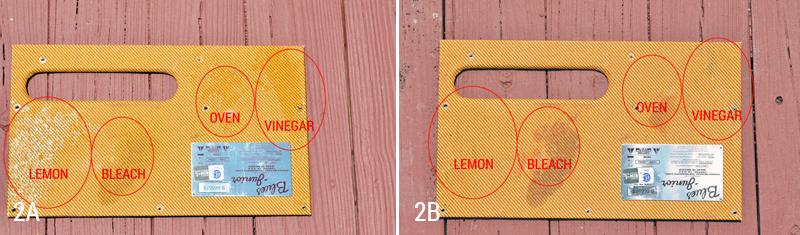
As you can see, the lemon juice and oven cleaner have added a very minimal amount of discoloration. The vinegar has a slightly larger impact on the color of the tweed, and the bleach actually turn the material a red/rust color.
I am enjoying the idea of using the vinegar and the bleach back and forth to introduce some variegation into my tweed material. Others may prefer the look of different solutions, so feel free to proceed as you please. I will now apply the solution to random parts of my cabinet, as this staining somewhat mirrors general age and sun exposure, which can certainly be random.
The truth is, when a cabinet has been naturally aged, some of that age comes from years of setting down beers on top of the cabinet, friends spilling a little water/coffee on it in various places, setting down a cigarette on the top of the amp for a few minutes while you practice the chorus of a new song, playing outdoor gigs occasionally, etc. An Innumerable amount of chaotic moments play into how an aged amp looks, so we need to be mindful of that when applying staining solutions to our tweed. Thus, I’m not going to TRY to make my cabinet look like anything in this regard; instead, I will let the chaos create the art.
PHYSICAL WEAR AND TEAR: FILES AND SANDPAPER
Hauling an amp around from gig to gig, practice to practice for 20 years will also give an amp quite a bit of personality. No matter how careful we try to be, we always bump into door frames or hit the amp with our guitars. Half the time, we let a friend cary the amp and it’s never ever the same...but that’s just the nature of the business. But here is the mind-boggling part...I know I said just above that the staining section required chaos, and that is very true; however, NOW we have to tame that chaoss and imagine the logical places on our amp which would actually get damaged the most.
Corners; ALWAYS. Edges above and below the speaker baffle afrea; definitely. Underneath the handle where we constantly grab and rub up against the material; light wear, for certain. Try to think about how your amp has been handled, where it has been, who has touched it. Think about some falls it has taken, some bumps it’s been given, etc. And then, it’s just time to experiment with tools. For larger gashes and tears, use a rasp or file; this will really pull up the material for that look where the amp once took a BIG HIT. For other, minor wear and tear that has occurred slowly over the years, try using gradually lower grits of sandpaper. Start out relatively fine, and then try to get more and more coarse and see the affects.
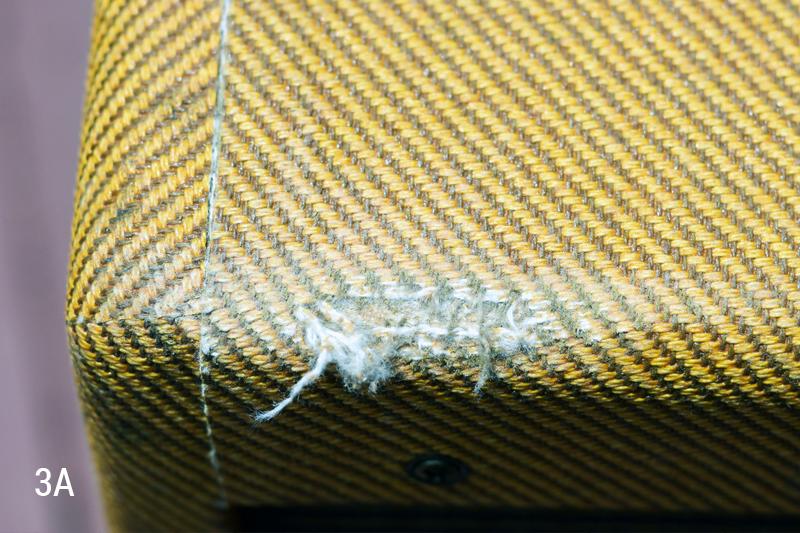
In image 3A below, you’ll see the effects of a file on a corner…
In image 4A below, you’ll see the effects of a finer sandpaper vs. a more coarse sandpaper...
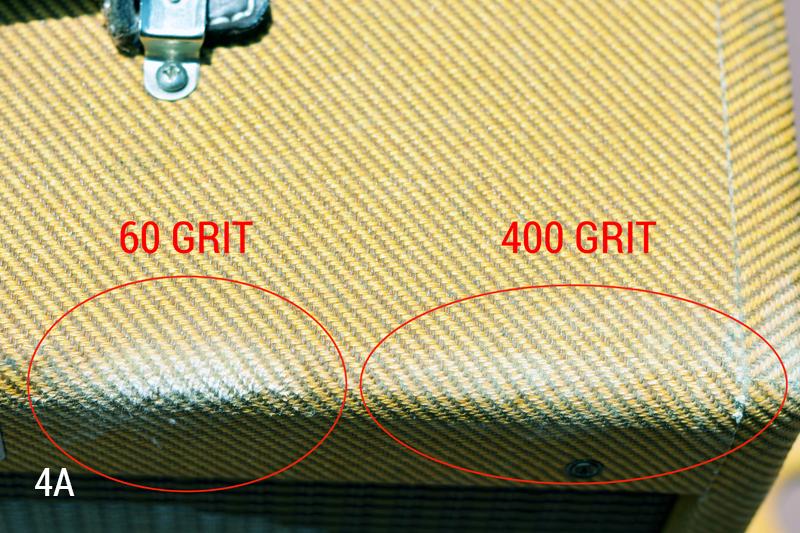
As you can see, the file and/or rasp are successful in fraying the material quite heavily and even pulling it all the way back if desired. This can give the appearance of a big fall or somethin having severely scraped the amp, whereas the different sandpapers give the appearance of small hits, chronic rubbing, and lighter scrapes.
Again, there needs to be a harmonious blend of chaos and and calculation here. Certain areas will be constantly worn on any amp, others will take an unpredictable hit at some point. I am going to move forward and start tearing this thing up...and yes, this is the fun part!
BIG STAINS: COFFEE, TEA, ETC.
Alright, now it’s time to move on to bigger stains. Stains like that time Ted came over and sat on your amp while you played but then knocked over a Coca-Cola on the top of the amp...come on Ted! Or, the time you set down a cigarette and let it burn a little too long. These are these stains from years of playing in clubs with crowds of people slinging beer around, and your amp absorbing smoke.
These stains are harder to mimic but using things like wet coffee grounds and hot tea can add some life to your tweed in a heartbeat. I’m going to go ahead and boil some water and then steep three bags of tea in one single cup of the water. This will give me a higher concentration of what is basically going to be used as a low-grade fabric dye. I will then use the tea bags to sling, slap, and drop tea all over my cabinet to add some more of that calculated chaos. Check out Image 5A below for an example of how this can affect the tweed…
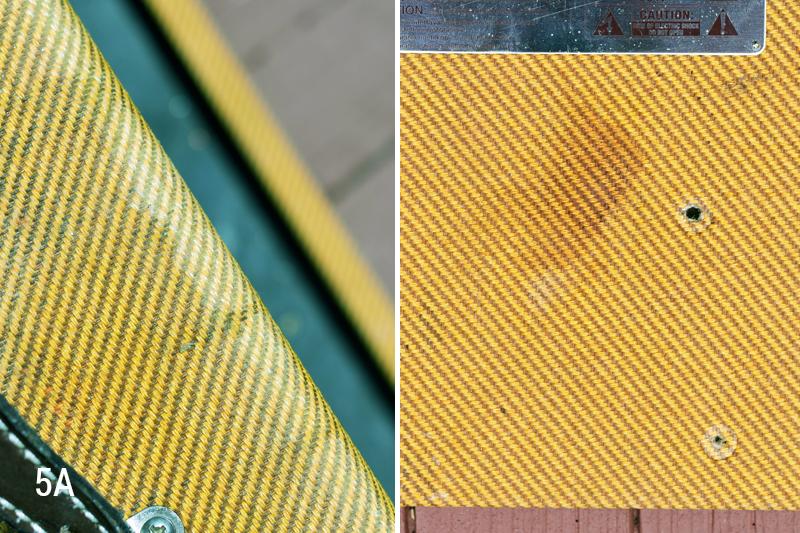
You can see how this adds some minor-looking stains to the fabric. You could even wet the bottom of a mug with the tea and let the mug sit on top of the amp for an hour or two and let that soda/coffee/tea ring really set in.
To add deeper-looking stains, I am going to see how it looks when I use wet coffee grounds and rub them into the fabric firmly. First, I’m going to use that same 400 grit sandpaper from before to rough up the parts where I want to rub in the coffee grounds -- this will help them sit deeper in the fabric. Once I’ve roughed up the fabric a little, I’m going to use the leftover water from my tea to mix with my coffee grounds and rub into the tweed. Note: my old tea water is still a little warm. Don’t burn yourself by using freshly boiled water, wait until the water is safe to touch but still warm enough to set a stain.
Check out how this affects the tweed in Image 6A below…
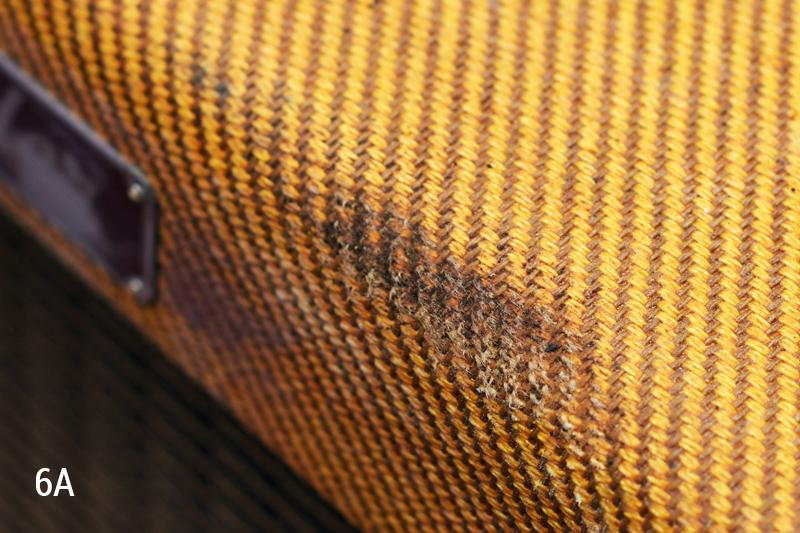
I really like the way the deep stains inside the scratches look, so if I were to go all out on this project, that is the method I would most likely choose for a large portion of my cabinet. You can also dilute the coffee grounds in more water and use a rag to apply the mixture to larger potions of your cabinet to add tinting to it.
Okay these are the methods we have time for today. There are a ton of other DIY ways to age your cabinet; some people actually spill beer on their cabinets, some people burn cigarette holes in the top panel... you name it. The biggest thing to remember is this: we don’t want to compromise the structural integrity of our cabinets, we just want to modify them superficially. This way, we have a cabinet that both protects the amp, and looks super cool.
I will add that the best way to start (or finish) the aging process is to add a layer of lacquer to your cabinet. This will darken it up overall and give it a look like it has been sitting in a club getting cigarette smoke blown over it for years. From there, you can choose to use any of the aging techniques from this article or any other techniques you may have heard of. In any case, remember to be careful and get ready to commit because you can’t turn back once you start. We’ll see you next time -- thanks for following along!
No one can deny how cool a tweed-covered cabinet looks once it gets a fair amount of age and road wear on it. Tears in the fabric, chaotic stains, and general tinting of the tweed itself all give the material a bump in personality and add soul and story to the gear. Because of this, the concept of intentionally aging tweed material has been explored for many years. With a quick Google search, one could stumble across any number of DIY methods for aging tweed, so today we are going to experiment (and do some side-by-side comparisons) with a few of those methods and see how they all affect the material.
If you are bold enough to follow along, you’ll need a small list of materials:
Tweed-covered cabinetBleachLemonVinegarOven CleanerSpray BottleRasp/Sandpaper/FileCoffeeTea
Before I dive in, I am going to remove any and all electronic components from my cabinet to avoid damaging them in any way. As you can see below, in Image 1A, my cabinet is empty and ready to be carefully destroyed.
My cabinet has already been slightly road-worn, which will help with the end result, but I’m ready to get this thing looking like it’s about to tell you the story it heard from its father, and its father before it.
Our goal here today is to cause aesthetic damage to our cabinet without compromising the structural integrity of the cabinet itself -- the enclosure still needs to protect our amp, tubes, and speaker, so any functional damage to the cabinet is not recommended.
SUN AND GENERAL AGE: LEMON JUICE, BLEACH, VINEGAR, OVEN CLEANER
Let’s start by trying to add a few stains to this here cabinet. I plan on experimenting with a few different solutions. I’m going to apply lemon juice, bleach, white vinegar, and oven cleaner to different parts of my cabinet’s back panel to see how the material reacts to each. All of these materials are considered corrosive to varying degrees, and in my research I found that these were all common methods of aging tweed (except the oven cleaner...that one was my idea).
I’m going to slice the lemon, squeeze it and rub it on a specific spot. Then I’ll add my bleach to an old spray bottle using 1 part bleach to 1 part water, use a paper towel to apply the white vinegar, and then simply spray the oven cleaner from its bottle. Once I find a look I prefer (and maybe I’ll prefer a number of looks), I will then apply that solution chaotically across my cabinet.
Notice below in Image 2A, the four places I have applied the different solutions. And then notice in Image 2B the result after 24 hours of letting the back panel sit in the sun while these solutions did their dirty work…
As you can see, the lemon juice and oven cleaner have added a very minimal amount of discoloration. The vinegar has a slightly larger impact on the color of the tweed, and the bleach actually turn the material a red/rust color.
I am enjoying the idea of using the vinegar and the bleach back and forth to introduce some variegation into my tweed material. Others may prefer the look of different solutions, so feel free to proceed as you please. I will now apply the solution to random parts of my cabinet, as this staining somewhat mirrors general age and sun exposure, which can certainly be random.
The truth is, when a cabinet has been naturally aged, some of that age comes from years of setting down beers on top of the cabinet, friends spilling a little water/coffee on it in various places, setting down a cigarette on the top of the amp for a few minutes while you practice the chorus of a new song, playing outdoor gigs occasionally, etc. An Innumerable amount of chaotic moments play into how an aged amp looks, so we need to be mindful of that when applying staining solutions to our tweed. Thus, I’m not going to TRY to make my cabinet look like anything in this regard; instead, I will let the chaos create the art.
PHYSICAL WEAR AND TEAR: FILES AND SANDPAPER
Hauling an amp around from gig to gig, practice to practice for 20 years will also give an amp quite a bit of personality. No matter how careful we try to be, we always bump into door frames or hit the amp with our guitars. Half the time, we let a friend cary the amp and it’s never ever the same...but that’s just the nature of the business. But here is the mind-boggling part...I know I said just above that the staining section required chaos, and that is very true; however, NOW we have to tame that chaoss and imagine the logical places on our amp which would actually get damaged the most.
Corners; ALWAYS. Edges above and below the speaker baffle afrea; definitely. Underneath the handle where we constantly grab and rub up against the material; light wear, for certain. Try to think about how your amp has been handled, where it has been, who has touched it. Think about some falls it has taken, some bumps it’s been given, etc. And then, it’s just time to experiment with tools. For larger gashes and tears, use a rasp or file; this will really pull up the material for that look where the amp once took a BIG HIT. For other, minor wear and tear that has occurred slowly over the years, try using gradually lower grits of sandpaper. Start out relatively fine, and then try to get more and more coarse and see the affects.
In image 3A below, you’ll see the effects of a file on a corner…
In image 4A below, you’ll see the effects of a finer sandpaper vs. a more coarse sandpaper...
As you can see, the file and/or rasp are successful in fraying the material quite heavily and even pulling it all the way back if desired. This can give the appearance of a big fall or somethin having severely scraped the amp, whereas the different sandpapers give the appearance of small hits, chronic rubbing, and lighter scrapes.
Again, there needs to be a harmonious blend of chaos and and calculation here. Certain areas will be constantly worn on any amp, others will take an unpredictable hit at some point. I am going to move forward and start tearing this thing up...and yes, this is the fun part!
BIG STAINS: COFFEE, TEA, ETC.
Alright, now it’s time to move on to bigger stains. Stains like that time Ted came over and sat on your amp while you played but then knocked over a Coca-Cola on the top of the amp...come on Ted! Or, the time you set down a cigarette and let it burn a little too long. These are these stains from years of playing in clubs with crowds of people slinging beer around, and your amp absorbing smoke.
These stains are harder to mimic but using things like wet coffee grounds and hot tea can add some life to your tweed in a heartbeat. I’m going to go ahead and boil some water and then steep three bags of tea in one single cup of the water. This will give me a higher concentration of what is basically going to be used as a low-grade fabric dye. I will then use the tea bags to sling, slap, and drop tea all over my cabinet to add some more of that calculated chaos. Check out Image 5A below for an example of how this can affect the tweed…
You can see how this adds some minor-looking stains to the fabric. You could even wet the bottom of a mug with the tea and let the mug sit on top of the amp for an hour or two and let that soda/coffee/tea ring really set in.
To add deeper-looking stains, I am going to see how it looks when I use wet coffee grounds and rub them into the fabric firmly. First, I’m going to use that same 400 grit sandpaper from before to rough up the parts where I want to rub in the coffee grounds -- this will help them sit deeper in the fabric. Once I’ve roughed up the fabric a little, I’m going to use the leftover water from my tea to mix with my coffee grounds and rub into the tweed. Note: my old tea water is still a little warm. Don’t burn yourself by using freshly boiled water, wait until the water is safe to touch but still warm enough to set a stain.
Check out how this affects the tweed in Image 6A below…
I really like the way the deep stains inside the scratches look, so if I were to go all out on this project, that is the method I would most likely choose for a large portion of my cabinet. You can also dilute the coffee grounds in more water and use a rag to apply the mixture to larger potions of your cabinet to add tinting to it.
Okay these are the methods we have time for today. There are a ton of other DIY ways to age your cabinet; some people actually spill beer on their cabinets, some people burn cigarette holes in the top panel... you name it. The biggest thing to remember is this: we don’t want to compromise the structural integrity of our cabinets, we just want to modify them superficially. This way, we have a cabinet that both protects the amp, and looks super cool.
I will add that the best way to start (or finish) the aging process is to add a layer of lacquer to your cabinet. This will darken it up overall and give it a look like it has been sitting in a club getting cigarette smoke blown over it for years. From there, you can choose to use any of the aging techniques from this article or any other techniques you may have heard of. In any case, remember to be careful and get ready to commit because you can’t turn back once you start. We’ll see you next time -- thanks for following along!