Five Tips To Perk Up Your Tube Amp
Published on
January 21, 2021 at 4:10:52 PM PST January 21, 2021 at 4:10:52 PM PSTst, January 21, 2021 at 4:10:52 PM PST
Whether a guitar amp is several years old, or several decades old, it can start to lose its sonic luster after hundreds or thousands of hours of use. Too often, the gradual slide into dull, muddy, or noisy performance (or all three) leads a guitarist to think they, “just don’t like this amp anymore,” and need a new one to replace it.
In most cases, however, an amp that’s starting to lack the punch and liveliness it delivered when we first fell in love with it, can be perked up with a few points of routine maintenance, and brought back to a raging tone machine for far less of an investment than that required to get back on the merry-go-round and find a new amp to replace it. Check out these five tips for perking up tired tube amps, several of which you can do yourself (or all of which, if you have experience working inside amp chassis’ safely) or which, at most, require routine repair work.
One: Replace Your Tubes
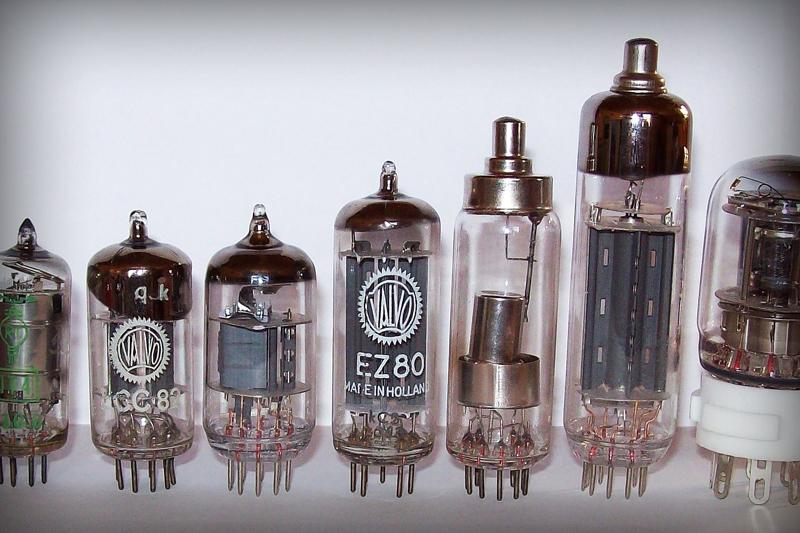
Most guitarists who own and regularly play tube amps are aware that the tubes need to be replaced every so often, but it can still be too easy to slip into the feeling that you, “just don’t like this amp any more,” or that there’s something more dramatic wrong with it, when you might just need to consider whether it’s time for a tube change. Replacing either preamp tubes or output tubes—or both, if it’s really been a while—can make a world of difference to an amp’s sound and playing feel; It’s always worth giving this some serious consideration if your amp is sounding tired.
Output tubes (also called “power tubes”) tend to wear out faster than preamp tubes, and sadly, they’re also a bigger investment. Signs of a need for replacement here might be heard in an amp that’s notably softer or duller than it once was, or one that has developed a spongier, saggier playing feel.
Depending on how loud and how often you play, output tubes might need to be replaced anywhere from every six months to every two or three years (or longer if you’re a hobby player who doesn’t fire up the amp more than briefly once or twice a week). With cathode-biased amps or those which have a preset fixed-bias level and require a specific grade of replacement tube, you can just buy a good quality matched set and install them. Follow your manufacturer’s instructions, of course, and reading up on other advice for tube replacement beforehand (at the risk of making a gratuitous plug, my book The Guitar Amp Handbook, Updated and Expanded Edition discusses a lot of stuff regarding tube replacement, as do other reputable amp books). With standard fixed-bias amps, you will need to bias the output tubes when you replace them and, if you’re not trained in such work, it’s a job for a qualified repairperson. It’s worth doing, though, and it shouldn’t cost a whole lot more than the price of the replacement tubes.
Replacing preamp tubes is even easier (and often more affordable) than installing new output tubes, so you might even want to try this one first, even if the output tubes are the culprit. Pop in a good new preamp tube into the first position to see what that does for you (this tube is often called “V1” on diagrams, and is frequently the furthest socket away from the larger output tubes). A good new-make preamp tube from a reputable dealer is just fine, and there’s plenty of variety in great-sounding tubes available today (check out some of Mojotone’s own tube-tasting articles to explore a little of this selection).
Understand that preamp tubes don’t fail as frequently as output/power tubes, and decent ones should last several years unless abused. They will, sometimes, go dull prematurely, and they are cheaper and easier to replace than your bigger tubes, so this is why it’s worth a try even if you suspect the power tubes might be the major culprit. Signs of genuine preamp tube failure or decline, on the other hand, might be heard as increased noise or intermittent or steady crackling, hissing, or popping in the preamp stage, increased microphony (bell-like ringing, or the induction of cabinet vibration into the signal path) or again, a generally duller tone that’s lacking its former liveliness. If you suspect a preamp tube of microphony or some more structural-based decline, you can—with your amp on, but not turned up too high—tap each preamp tube gently with a pencil to see if you get an excessive “clunk” or ringing sound. Even healthy preamp tubes might transfer a little, muted “thump” through the circuit, but a tube that has declined structurally will make itself known!
Two: Get Your Voltages Correct

The average guitarist puts very little thought into the voltage levels his or her amp is receiving from the domestic or commercial power supply they plug it into—and why should you, when your amp is made to operate “just fine” on the voltage levels in the country in which you bought it? But many of our wall outlets can deliver anywhere from 118V to 126V AC (which will vary at different times of day, too), and experienced amp makers, technicians, and players who put a lot of thought into such things, are well aware that an amp will sound and respond quite differently at the lower end of that range than it will at the higher.
Consider, also, that vintage amps from the ’50s, ’60s, and even the early ’70s were often designed to run on domestic power outlets delivering anywhere from 110V to 115V AC, but usually don’t function as they should when hit with a lot more. They might work, sure, but their components will be under greater strain and they often won’t sound they way they were designed to sound.
To get your amp working with optimal voltages, have a tech check the operating voltages at various stages within your amp against the voltages indicated on an original service schematic or diagram. Then, do whatever possible to bring things back into spec. Such a service should also include a re-biasing of output tubes, or perhaps a check and replacement of the large bias resistor in cathode-biased amps, if deemed necessary.
If your amp has a tube rectifier, the voltages in some amps can be brought down to spec with the use of a different—though compatible—rectifier tube (don’t try this without consulting an expert, if you’re not experienced with this kind of thing, and always refer to your amp-maker’s guidelines, or contact them directly). Otherwise, sometimes other internal fixes can be undertaken. Or, you can acquire an external voltage-reduction device intended for this purpose, such as a suitable Variac, the P3 Line Tamer, or the AmpRx Brown Box, and regulate your amp’s input AC voltage in this way. Note that it’s usually fine to lower the amount of AC voltage that your amp is receiving, but you should never increase it without consulting someone who really knows what they’re talking about. Some players even lower their AC supply voltages intentionally, even when the amp works and sounds fine on the unadulterated supply, to achieve desirable sonic goals, such as easier breakup, a slightly softer and more compressed playing feel, and/or a little lower overall volume.
Three: Clean Grimy Connection Points

As pedal-maker-to-the-stars Pete Cornish declares, “Clean the plugs and free the tone!” Any jack or connection with pins or contacts that transfers a signal from something else that’s “plugged into it” can become dirty or tarnished and therefore fail to transfer your guitar signal optimally. This goes for input jacks, speaker output jacks, any effects-loop sends and returns, and all of the tube sockets.
A simple cleaning of these parts with a good contact cleaner (DeoxIT, No Flash, or similar) can often work wonders in getting your full signal flowing again, and can help your amp sound clearer and sharper in the process. If you have to open up an amp’s chassis to get at these things—and you usually do—you should have a pro do this work for you. While he or she is in there, also have them clean all the pots and, if necessary, tighten the tube socket pins as well. Short of taking it to a tech, you can go a little ways towards cleaning input and output jacks by spraying contact cleaner on a cotton bud (a.k.a. Q-Tip) and working it back and forth through the hole until you see some dark grime building up on its tip. Also, you might get away with spraying just a quick squirt of approved cleaner into your tube socket’s pin holes, or even onto the tubes’ pins themselves, then inserting and removing the tubes a couple of times.
Four: Install Fresh Filter Capacitors

Filter capacitors (aka electrolytic capacitors, or “caps” for short) remove troublesome artefacts from your power supply which can cause noise or poor tube performance. The sad fact is, though, that they wear out after several years, which might be as few as 15 years, or as many as 25 years if you’re lucky. If your amp is an older one (which doesn’t necessarily mean it’s “vintage”) and hasn’t had any general maintenance in 10 or 15 years, it’s certainly worth having your tech take a look at the filter caps; There’s often a good chance that it will need a few new ones, if not all new ones.
If you know for certain that your amp hasn’t had its filter caps replaced in a good 20 to 25 years, or is a vintage amp that’s never been worked on, you can bet a cap job would do it some good. If the caps are that old or older and haven’t failed, you can opt to just keep playing it, and if you love the way it sounds then it’s hard to argue against that—except to say that caps of 20 or 25 years old or more are pretty likely to fail at any moment, and can sometimes cause bigger problems when they do, so a little preventative maintenance is often a good thing.
Old or failed filter caps will often result in a soft, flubby low end and usually some dissonant odd-order “ghost note” harmonics as well. These symptoms go straight to the heart of a lifeless, farty tone, and a cap replacement in such cases often perks up your amp’s performance significantly. Filter cap replacement involves working in parts of the amp where dangerously high voltages are present, so it’s definitely a job for a pro. That said, it’s usually one of the less expensive internal maintenance items, depending on what types of caps your amp needs, how many, and how tricky they are to access.
Five: Replace Leaky Signal Caps

The other capacitors within your amplifier, the signal (or “coupling capacitors,” because they couple together different signal-carrying stages within your amp) sometimes also need replacement, although those used in amps after the ’70s generally tend to last a very long time. These are similar (and sometimes identical) to the tone caps attached to your guitars’ tone controls, and are sometimes called by that name too. Worn out coupling caps can become “leaky,” which means they don’t block the voltages they are designed to block, nor do they let their particular circuit stages perform as they should. Other than in particularly old vintage amps that were originally made with failure-prone signal caps, the several signal caps within any amp don’t generally go bad all at once. You can bet, however, that any amp from the ’50s or ’60s will have at least a few leaky signal caps, and even nearly-new amps might display a failure here and there in this department (if a part unexpectedly experiences the occasional early demise that can strike even the best components now and then).
While this is another job for a pro, you might want to have some input—and insist on some consultation mid-job—if you’re surrendering a particularly valuable vintage amp to this kind of work. In the old days, repair guys would often just rip out all of your tasty old vintage signal caps because it was quicker and cheaper than properly diagnosing which were actually at fault. A tech who is familiar with vintage amp values will understand that you want to preserve as many original components as possible, as these can play a big part in any old amp’s sonic character, as well as its value, but it doesn’t hurt to remind them to go easy. With newer amps, ensure replacement caps are at least as good or better than the originals—or read up on some upgraded replacements and see if they might do anything for your tone.
In most cases, however, an amp that’s starting to lack the punch and liveliness it delivered when we first fell in love with it, can be perked up with a few points of routine maintenance, and brought back to a raging tone machine for far less of an investment than that required to get back on the merry-go-round and find a new amp to replace it. Check out these five tips for perking up tired tube amps, several of which you can do yourself (or all of which, if you have experience working inside amp chassis’ safely) or which, at most, require routine repair work.
One: Replace Your Tubes
Most guitarists who own and regularly play tube amps are aware that the tubes need to be replaced every so often, but it can still be too easy to slip into the feeling that you, “just don’t like this amp any more,” or that there’s something more dramatic wrong with it, when you might just need to consider whether it’s time for a tube change. Replacing either preamp tubes or output tubes—or both, if it’s really been a while—can make a world of difference to an amp’s sound and playing feel; It’s always worth giving this some serious consideration if your amp is sounding tired.
Output tubes (also called “power tubes”) tend to wear out faster than preamp tubes, and sadly, they’re also a bigger investment. Signs of a need for replacement here might be heard in an amp that’s notably softer or duller than it once was, or one that has developed a spongier, saggier playing feel.
Depending on how loud and how often you play, output tubes might need to be replaced anywhere from every six months to every two or three years (or longer if you’re a hobby player who doesn’t fire up the amp more than briefly once or twice a week). With cathode-biased amps or those which have a preset fixed-bias level and require a specific grade of replacement tube, you can just buy a good quality matched set and install them. Follow your manufacturer’s instructions, of course, and reading up on other advice for tube replacement beforehand (at the risk of making a gratuitous plug, my book The Guitar Amp Handbook, Updated and Expanded Edition discusses a lot of stuff regarding tube replacement, as do other reputable amp books). With standard fixed-bias amps, you will need to bias the output tubes when you replace them and, if you’re not trained in such work, it’s a job for a qualified repairperson. It’s worth doing, though, and it shouldn’t cost a whole lot more than the price of the replacement tubes.
Replacing preamp tubes is even easier (and often more affordable) than installing new output tubes, so you might even want to try this one first, even if the output tubes are the culprit. Pop in a good new preamp tube into the first position to see what that does for you (this tube is often called “V1” on diagrams, and is frequently the furthest socket away from the larger output tubes). A good new-make preamp tube from a reputable dealer is just fine, and there’s plenty of variety in great-sounding tubes available today (check out some of Mojotone’s own tube-tasting articles to explore a little of this selection).
Understand that preamp tubes don’t fail as frequently as output/power tubes, and decent ones should last several years unless abused. They will, sometimes, go dull prematurely, and they are cheaper and easier to replace than your bigger tubes, so this is why it’s worth a try even if you suspect the power tubes might be the major culprit. Signs of genuine preamp tube failure or decline, on the other hand, might be heard as increased noise or intermittent or steady crackling, hissing, or popping in the preamp stage, increased microphony (bell-like ringing, or the induction of cabinet vibration into the signal path) or again, a generally duller tone that’s lacking its former liveliness. If you suspect a preamp tube of microphony or some more structural-based decline, you can—with your amp on, but not turned up too high—tap each preamp tube gently with a pencil to see if you get an excessive “clunk” or ringing sound. Even healthy preamp tubes might transfer a little, muted “thump” through the circuit, but a tube that has declined structurally will make itself known!
Two: Get Your Voltages Correct
The average guitarist puts very little thought into the voltage levels his or her amp is receiving from the domestic or commercial power supply they plug it into—and why should you, when your amp is made to operate “just fine” on the voltage levels in the country in which you bought it? But many of our wall outlets can deliver anywhere from 118V to 126V AC (which will vary at different times of day, too), and experienced amp makers, technicians, and players who put a lot of thought into such things, are well aware that an amp will sound and respond quite differently at the lower end of that range than it will at the higher.
Consider, also, that vintage amps from the ’50s, ’60s, and even the early ’70s were often designed to run on domestic power outlets delivering anywhere from 110V to 115V AC, but usually don’t function as they should when hit with a lot more. They might work, sure, but their components will be under greater strain and they often won’t sound they way they were designed to sound.
To get your amp working with optimal voltages, have a tech check the operating voltages at various stages within your amp against the voltages indicated on an original service schematic or diagram. Then, do whatever possible to bring things back into spec. Such a service should also include a re-biasing of output tubes, or perhaps a check and replacement of the large bias resistor in cathode-biased amps, if deemed necessary.
If your amp has a tube rectifier, the voltages in some amps can be brought down to spec with the use of a different—though compatible—rectifier tube (don’t try this without consulting an expert, if you’re not experienced with this kind of thing, and always refer to your amp-maker’s guidelines, or contact them directly). Otherwise, sometimes other internal fixes can be undertaken. Or, you can acquire an external voltage-reduction device intended for this purpose, such as a suitable Variac, the P3 Line Tamer, or the AmpRx Brown Box, and regulate your amp’s input AC voltage in this way. Note that it’s usually fine to lower the amount of AC voltage that your amp is receiving, but you should never increase it without consulting someone who really knows what they’re talking about. Some players even lower their AC supply voltages intentionally, even when the amp works and sounds fine on the unadulterated supply, to achieve desirable sonic goals, such as easier breakup, a slightly softer and more compressed playing feel, and/or a little lower overall volume.
Three: Clean Grimy Connection Points
As pedal-maker-to-the-stars Pete Cornish declares, “Clean the plugs and free the tone!” Any jack or connection with pins or contacts that transfers a signal from something else that’s “plugged into it” can become dirty or tarnished and therefore fail to transfer your guitar signal optimally. This goes for input jacks, speaker output jacks, any effects-loop sends and returns, and all of the tube sockets.
A simple cleaning of these parts with a good contact cleaner (DeoxIT, No Flash, or similar) can often work wonders in getting your full signal flowing again, and can help your amp sound clearer and sharper in the process. If you have to open up an amp’s chassis to get at these things—and you usually do—you should have a pro do this work for you. While he or she is in there, also have them clean all the pots and, if necessary, tighten the tube socket pins as well. Short of taking it to a tech, you can go a little ways towards cleaning input and output jacks by spraying contact cleaner on a cotton bud (a.k.a. Q-Tip) and working it back and forth through the hole until you see some dark grime building up on its tip. Also, you might get away with spraying just a quick squirt of approved cleaner into your tube socket’s pin holes, or even onto the tubes’ pins themselves, then inserting and removing the tubes a couple of times.
Four: Install Fresh Filter Capacitors
Filter capacitors (aka electrolytic capacitors, or “caps” for short) remove troublesome artefacts from your power supply which can cause noise or poor tube performance. The sad fact is, though, that they wear out after several years, which might be as few as 15 years, or as many as 25 years if you’re lucky. If your amp is an older one (which doesn’t necessarily mean it’s “vintage”) and hasn’t had any general maintenance in 10 or 15 years, it’s certainly worth having your tech take a look at the filter caps; There’s often a good chance that it will need a few new ones, if not all new ones.
If you know for certain that your amp hasn’t had its filter caps replaced in a good 20 to 25 years, or is a vintage amp that’s never been worked on, you can bet a cap job would do it some good. If the caps are that old or older and haven’t failed, you can opt to just keep playing it, and if you love the way it sounds then it’s hard to argue against that—except to say that caps of 20 or 25 years old or more are pretty likely to fail at any moment, and can sometimes cause bigger problems when they do, so a little preventative maintenance is often a good thing.
Old or failed filter caps will often result in a soft, flubby low end and usually some dissonant odd-order “ghost note” harmonics as well. These symptoms go straight to the heart of a lifeless, farty tone, and a cap replacement in such cases often perks up your amp’s performance significantly. Filter cap replacement involves working in parts of the amp where dangerously high voltages are present, so it’s definitely a job for a pro. That said, it’s usually one of the less expensive internal maintenance items, depending on what types of caps your amp needs, how many, and how tricky they are to access.
Five: Replace Leaky Signal Caps
The other capacitors within your amplifier, the signal (or “coupling capacitors,” because they couple together different signal-carrying stages within your amp) sometimes also need replacement, although those used in amps after the ’70s generally tend to last a very long time. These are similar (and sometimes identical) to the tone caps attached to your guitars’ tone controls, and are sometimes called by that name too. Worn out coupling caps can become “leaky,” which means they don’t block the voltages they are designed to block, nor do they let their particular circuit stages perform as they should. Other than in particularly old vintage amps that were originally made with failure-prone signal caps, the several signal caps within any amp don’t generally go bad all at once. You can bet, however, that any amp from the ’50s or ’60s will have at least a few leaky signal caps, and even nearly-new amps might display a failure here and there in this department (if a part unexpectedly experiences the occasional early demise that can strike even the best components now and then).
While this is another job for a pro, you might want to have some input—and insist on some consultation mid-job—if you’re surrendering a particularly valuable vintage amp to this kind of work. In the old days, repair guys would often just rip out all of your tasty old vintage signal caps because it was quicker and cheaper than properly diagnosing which were actually at fault. A tech who is familiar with vintage amp values will understand that you want to preserve as many original components as possible, as these can play a big part in any old amp’s sonic character, as well as its value, but it doesn’t hurt to remind them to go easy. With newer amps, ensure replacement caps are at least as good or better than the originals—or read up on some upgraded replacements and see if they might do anything for your tone.